

Overview – The Difference Between Low Impedance 8Ω and 100v Line Sound Systems
Essentially low impedance 8Ω (8 ohm) sound systems are used at home, in the car, for bands, discos and musicians and places where the loudspeakers are fairly close to the amplifiers or where high sound volumes (SPL) are required. Usually, a low impedance amplifier can have no more than two 8Ω speakers connected to each output channel – this results in a 4Ω loading to the amplifier. Read the amplifier user manual and never connect more loudspeakers to the low impedance terminals on the amplifier than advised by the manufacturer. The power handling of the loudspeakers should be 50% higher than the amplifier output to avoid damage. Cable should be of a high current rating so that maximum power is delivered to the loudspeakers. If you need more loudspeakers then you will need more amplifiers
Conversely 100v line constant voltage sound systems allow the use of much longer cable runs of thinner cable around a venue or site. Many loudspeakers with integral 100v line transformers can be wired in parallel without complication as long as the basic 90% wattage rule is followed. 100v line loudspeakers are rated in wattage rather than impedance – the total wattage of all loudspeakers on an amplifier output should not exceed 90% of the amplifiers rated output. A 120w 100v line amplifier could have a 20w loudspeaker, 4 x 10w loudspeakers and 3 x 6w loudspeakers connected and still have capacity for some future expansion
Please see the information below about low impedance 8Ω sound systems
Loudspeakers and wiring
- Please always use the power switch on your device to switch on or off – switching your device on or off at the wall socket is not good practice and may cause damage
- Please note that all diagrams and dialogue are for one audio channel only – for stereo you will need two sets of speakers and cables and for a 4-zone system you will need 4 sets of speakers and cabling etc.
- Read the amplifier user manual and never connect more loudspeakers to the low impedance terminals on the amplifier than advised by the manufacturer
- Warning – Do not connect low impedance, low Z or 8Ω loudspeakers to 100v line outputs on public address PA amplifiers
- Use terminal block to extend speaker cable
- Do not short speaker cables together
- Plan your loudspeaker layout and locations together with your cable routes
- Use cable with a minimum specification of 10a twin sheathed two core flex for the loudspeakers – this means that there is a blue and a brown wire inside a white outer (for instance)
- Install the loudspeaker cable – remember with low impedance PA sound systems all loudspeakers are usually connected in parallel – this means that the cable starts at the amplifier and goes to the first loudspeaker and from there to the second loudspeaker – there is normally no more than two loudspeakers on each amplifier output channel

- Remember that the total wattage of all of your loudspeakers added together should be higher than the rated wattage of your amplifier
- All loudspeakers must be connected in the same phase – it is likely that your cable and your loudspeakers do not have the same coloured wires – choose an obvious convention such as brown cable to red or + on loudspeaker and blue cable to black (for instance) and stick to it throughout your installation
- Once you have installed and connected all of your loudspeakers and you are happy that there are no short circuits or other problems with the installation you can connect the other end of your cable to your amplifier’s low impedance or 8Ω outputs
- Your amplifier may have both low impedance (low Z or 8 ohm) and 100v line connections – you must never use both at the same time or connect low impedance speakers to the 100v terminals
- Connect your wires to the ‘8 ohm’ and ‘com’ on the amplifier
- Your amplifier should ideally sit on top of your Internet Radio or other units so that there is adequate ventilation and airflow to keep the amplifier cool
- Turn all volume controls to minimum and set all bass and treble controls to midway
- Connect your microphone or music to the amplifier and switch your amplifier on
- Turn your master volume to around midway and gradually turn the microphone volume (or input volume) up while speaking into the microphone
- Adjust to the volume level that is required
It is important to match the speaker load with your amplifier’s output impedance so that you get maximum transfer of power and that you avoid dangerous amplifier conditions by using an incorrect load impedance. If you are unsure it is safer to use a higher impedance speaker load to help protect the amplifier. The manner in which your speakers (in a multi-speaker system) are wired together determines the overall impedance
- Read the amplifier manual and never connect more loudspeakers to the low imedance terminals on the amplifier than advised by the manufacturer
Wiring 2 Speakers in Parallel
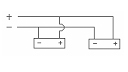 Two 8Ω speakers = 4Ω load to amplifier
Two 16Ω speakers = 8Ω load to amplifier
Alternative ways to wire low impedance loudspeakers
Wiring 2 Speakers in Series
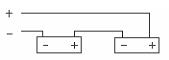 Two x 4 ohm speakers in series = 8 ohm load to amplifier
Two x 8 ohm speakers in series = 16 ohm load to amplifier
Wiring 4 Speakers in Series/Parallel
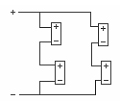 Four x 4 ohm speakers in series/parallel = 4 ohm load to amplifier
Four x 8 ohm speakers in series/parallel = 8 ohm load to amplifier
Four x 16 ohm speakers in series/parallel = 16 ohm load to amplifier
Wiring 4 Speakers in Parallel – this should be avoided if you are unsure of the amplifier’s minimum load impedance
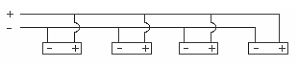 Four x 16 ohm speakers in parallel = 4 ohm load to amplifier
Inputs
- Microphones should only be connected to inputs marked ‘mic’ or ‘microphone’ while line sources such as media players should always be connected to inputs marked ‘aux’, ‘CD’ or ‘line’ on amplifiers
- As a rule of thumb a jack output on a wireless microphone receiver is line level and an XLR output is mic level
- When needed to can usually feed two or more amplifier inputs with the same signal from an MP3 player, internet radio or other device

Reminders – PA sound systems – basic setup rules
PA sound systems – basic setup rules
- Always turn on the power last – after you have connected up the whole sound system
- Always turn the power off first – before you strip down the sound system
- When turning your system on connect mains power to switch on your amplifier last after powering all other devices
- When turning your system off disconnect mains power to switch off your amplifier first before disconnecting all other devices
- Microphones should always be connected to inputs marked ‘mic’ on amplifiers
- Wireless microphone, or radiomic, systems usually have two outputs – the XLR output should be connected to XLR inputs marked ‘mic’ on amplifiers and the jack output should usually be connected to inputs marked ‘aux’ or ‘line’ on amplifiers
- Media players should always be connected to inputs marked ‘aux’, ‘CD’ or ‘line’ on amplifiers
- Remember – you must still project your voice when using any sort of microphone amplification system
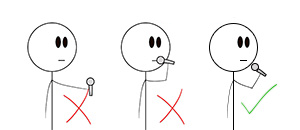
and ALWAYS use the microphone from a position behind the loudspeakers
- Commercial and industrial 100v line cabinet, projection, horn, ceiling & column type loudspeakers should always be connected to the 100v line terminals on amplifiers
- Hifi, disco and similar 8Ω – low impedance cabinet type loudspeakers should always be connected to the 8-16Ω terminals or connectors on amplifiers – never connect these speakers to the 100v terminals on amplifiers
- Never use 100v line & 8Ω speakers on the same sound system
E&OE