

Read the Instruction Manual First
Essentially low impedance 8Ω (8 ohm) sound systems are used at home, in the car, for bands, discos and musicians and places where the loudspeakers are fairly close to the amplifiers or where high sound volumes (SPL) are required. Usually, a low impedance amplifier can have no more than two 8Ω speakers connected to each output channel – this results in a 4Ω loading to the amplifier. Read the amplifier user manual and never connect more loudspeakers to the low impedance terminals on the amplifier than advised by the manufacturer. The power handling of the loudspeakers should be 50% higher than the amplifier output to avoid damage. Cable should be of a high current rating so that maximum power is delivered to the loudspeakers. If you need more loudspeakers then you will need more amplifiers
So you’re all set up & ready to go – or are you? Getting the best sound at your gigs entails learning the basics of sound engineering, you don’t need to do a course or spend loads of time in a studio but it is important that you become acquainted with your new PA sound system equipment
The main equipment you will be using is your powered mixer, mixer amp or mixing desk which is the unit that controls the sound produced. Most mixers have a graphic equaliser and/ or bass, mid and treble controls plus an auxiliary for effects so we’ll start with these. (Singers might initially practice using backing tracks to get a feel for the equipment and then rehearse with other musicians. If possible record yourself and listen to the differences that are produced with various settings and volumes)
For demonstration purposes we are using a mixer desk, but the principles and basic layout are pretty standard on most mixing and powered mixer units. All master volume, graphic equalisers, effects, auxiliary and monitor controls are usually located on the right hand side of the mixing desk or powered amp. Some mixers also have RCA phono inputs/outputs for media players and slave/powered monitors. On the left hand side are the individual channel XLR and jack inputs and controls whilst on the right hand side are the master and output controls
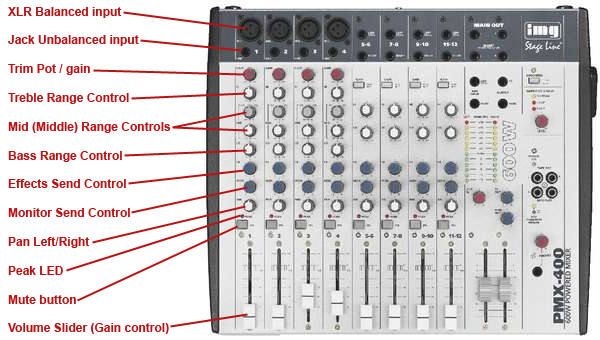
Set-up a Mixing Desk
Please Note: This is a basic general layout which will vary depending on the type, make & size of mixer and not an exact replication of the IMG Stageline powered mixer shown above
- Turn all volume, gain and effects controls fully anti-clockwise to zero
- Turn all bass, mid and treble controls to their centre (12 ‘clock) zero position
- Turn your main Volume or gain control up to half way
- Turn your backing track volume control up to a comfortable level
- Turn your microphone volume control up to just above the backing track volume level and ensure that you can hear yourself clearly without the system ringing at on the onset of acoustic feedback
- Check your mute or reverb is off
- Set ‘Pan’ controls to the centre and then adjust them left/right to suit the venue and your requirements (don’t be heavy handed, small changes in settings make a big difference)
- Practice speaking and singing before adjusting any equalisation or effects
- Gradually adjust the bass, mid range then treble a notch at a time and note the difference in the sound. Your ears are your best guide and you should wander around the room to hear the overall effect
- The settings for your backing tracks will depend on how well they have been recorded and the type and size of venue you perform in but ideally you should aim for a sound that is not too ‘muddy’ or ‘muffled’ (less bass, add a little mid and/or treble), too ‘tinny’ (turn down the treble, adjust the mid range and/or bass) or ‘boomy’ (less or no reverb/echo is best on your backing track)
- The same applies to your vocals. You will need to practice adjusting the settings until you are happy with how your voice sounds (without reverb/effects)
- Once you are happy with your overall sound add other inputs and repeat the process, remembering that guitars and other instruments should not be directly connected to the mixer – it is best to use a DI box (direct injection box) for each guitar and keyboard
And please remember:
- When turning your system on connect mains power to switch on your amplifier last after powering all other devices
- When turning your system off disconnect mains power to switch off your amplifier first before disconnecting all other devices
Watts
Unlike many we state wattage as RMS ratings (true wattage) – if we mean PPMO music power, US watts or peak watts we say so. Remember American peak PPMO music power watts can be stated as up to 4 times higher than RMS – often causing confusion
Wiring and installing low impedance speakers and sound systems
Speaker Leads
- Internal fuses will blow and the amplifier will be damaged if you use faulty speaker leads or speakers. Always look after your interconnect cables – they are easily damaged – especially in a portable or mobile sound system. The leads and any damage directly caused by using faulty leads is not covered by the Sound Services or manufacturers warranty unless the leads exhibit a manufacturing fault. Immediately stop using the sound system if you suspect that you have damaged the speaker leads or speakers in any way
- Maximum volume that a PA sound system is capable of producing before incurring equipment damage will be apparent by noticeable audio distortion – this may well occur when the volume control(s) are set well down from their maximum position! If you can hear distortion the sound system is being damaged! Turn the volume and the bass down!
- Most portable sound systems can only be used with a maximum of two 8 ohm speakers per amplifier output channel
UK Licenses for Music, Wireless Microphones / Radiomics and In Ear Monitoring (IEM)
Wireless Microphones
- Wireless microphone systems should preferably be connected to inputs marked ‘mic’ on amplifiers
- Remember – you must still project your voice when using any sort of microphone amplification system
To avoid acoustic feedback howl microphones must never be used in front of or otherwise near to any loudspeakers. Always ensure that the person wearing / using the microphone / wireless microphone does not go within 3m to 4m of the loudspeaker(s) - Body worn and clothing clip microphones should be central on the body and around 20cm below the mouth. Feedback is very likely with this sort of microphone – it can only be used to reinforce the voice
- Headworn microphones should always be protected by a foam windshield and be worn as near to the mouth as possible
- Hand held microphones sound ‘warmer’ and exhibit less feedback if they are close to the mouth
- Feedback is primarily caused by proximity of microphone(s) to loudspeaker(s), incorrect placement of loudspeakers, too much volume and/or incorrect tonal settings on the amplifier
- The microphone(s) must always be behind the loudspeakers
- VHF wireless mics will normally transmit up to 33m (100ft) from the receiver in the poorest conditions – in optimum conditions this distance can, at times be doubled. UHF wireless mics will not normally extend beyond this 33m maximum
- Always remember to keep wireless microphone transmitters at least 2 to 3m from their receivers and use each transmitter at least a 1m or away from other transmitters
- Remember that the wireless microphone transmitter and receiver should have ‘line of sight’ between each other
- Please note that wireless microphone receivers can be affected by CD players and other equipment which may produce RF (radio waves)
- Please read all manufacturers instructions prior to using any equipment
- For sports, aerobics, dance and other exercise based activities it is preferable to wear you wireless mic transmitter belt pack in a custom pouch and belt such as the IMG Stageline belts
Batteries
- Please ensure that the manufacturers instructions including the initial charge and use of rechargeable batteries and their recommended care of rechargeable batteries is noted and passed on to all users of battery operated equipment
- Never attempt to recharge any style or make of single-use dry cell battery
- Always fully charge NiMh rechargeable batteries prior to use
Wearing a Headworn Microphone
It is important to position a headworn microphone in the correct way – usually the headband goes around the back of your head and the microphone boom arm is on the left of your face with the microphone not touching your lips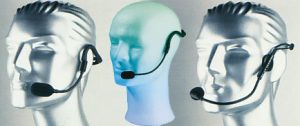
Correct Microphone Handling
Remember – you must still project your voice when using any sort of microphone amplification system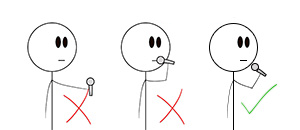
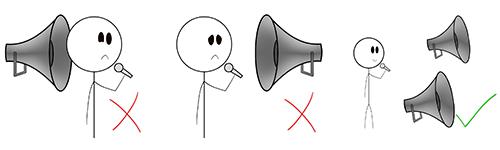
How to Minimise Acoustic Feedback
- Acoustic feedback howl is caused by a number of factors such as microphones being too close to loudspeakers, too much volume or bass, unmatched equipment or equipment not suited to the use or venue
- To avoid acoustic feedback howl in PA sound systems microphones should not be used in front of or otherwise near to any loudspeakers. For live sound it is important to hold your microphone correctly
- Always ensure that the person wearing / using the microphone or wireless microphone does not go within 3m to 4m of the loudspeaker(s)
- Body worn clothing clip microphones should be central on the body and around 20cm below the mouth. Feedback is much more likely with this sort of microphone – it can only be used to reinforce the voice
- Headworn microphones should always be protected by a foam windshield and be worn as near to the mouth as possible
- Hand held microphones sound ‘warmer’ and exhibit less feedback if they are used closer to the mouth
- Remember – you must still project your voice when using any sort of microphone system
- Feedback is primarily caused by proximity of microphone(s) to loudspeaker(s), incorrect placement of loudspeakers, too much volume and/or incorrect tonal settings on the amplifier – turn the bass and volume down and use the low cut filter!
- The microphone(s) must always be behind the loudspeakers
- Use a specialist feedback controller with your sound system
- ALWAYS use the microphone from a position behind the loudspeakers

Click for information on DMX Lighting
E&OE