The Difference Between 100v Line and Low Impedance 8Ω Sound Systems
Essentially 100v line constant voltage sound systems allow the use of much longer cable runs of thinner cable around a venue or site. Many loudspeakers with integral 100v line transformers can be wired in parallel without complication as long as the basic 90% wattage rule is followed. 100v line loudspeakers are rated in wattage rather than impedance – the total wattage of all loudspeakers on an amplifier output should not exceed 90% of the amplifiers rated output. A 120w 100v line amplifier could have a 20w loudspeaker, 4 x 10w loudspeakers and 3 x 6w loudspeakers connected and still have capacity for some future expansion
Conversely low impedance 8Ω (8 ohm) sound systems are used at home, in the car, for bands, discos and musicians and places where the loudspeakers are fairly close to the amplifiers or where high sound volumes (SPL) are required. Usually, a low impedance amplifier can have no more than two 8Ω speakers connected to each output channel – this results in a 4Ω loading to the amplifier. Read the amplifier user manual and never connect more loudspeakers to the low impedance terminals on the amplifier than advised by the manufacturer. The power handling of the loudspeakers should be 50% higher than the amplifier output to avoid damage. Cable should be of a high current rating so that maximum power is delivered to the loudspeakers. If you need more loudspeakers then you will need more amplifiers
Please see the information below about 100v line PA sound systems
Why 100v Line?
Click here to buy a complete sound system
The reason for using 100v line on public address & PA sound systems is to minimise power losses in the cable. For example if a 30 watt, 8Ω speaker is connected to a 30w amplifier by 100m of 6a cable (which over the 100m would have a resistance of about 4Ω) a third of the power will be lost in heating up the cable because the power consumption is proportional to the cable resistance
However, if a 100v line system is used, the output of the 30w amplifier would be at 330Ω, which renders the 4Ω resistance of the cable to a negligible amount. The power used is still the same (P = V x I) but as the current is lower more of the power from the amplifier is successfully transferred to the speakers
Before You Install or Use Your Public Address Sound System
Knowledge:
Circuits, wiring, connecting, terminology and repairs
Wireless mic frequencies
Knowledge & data available on SD cards and memory sticks
Please read this before you start to install or use your public address or PA sound system
- Please always use the power switch on your device to switch on or off – switching your device on or off at the wall socket is not good practice and may cause damage
- Warning – incorrect wiring of 100v line amplifier and loudspeaker systems will cause damage to your equipment – if you are not sure, please call or email Sound Services for guidance before you proceed
- Use terminal block to extend speaker cable
- Do not short speaker cables together
- Plan your loudspeaker layout and locations together with your cable routes
- Use 10a flex cable for 100v line – a minimum specification of 6a double insulated, twin sheathed two core flex (02162) must be used for the loudspeakers – this means that there is a blue and a brown wire inside a white outer (for instance) and it is at least the size of cable on your table lamp etc.
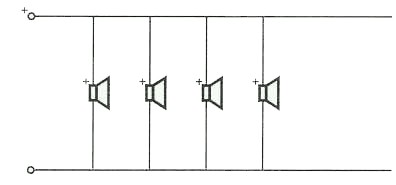
- Install the loudspeaker cable – remember with 100v line PA sound systems all loudspeakers are connected in parallel – this means that the cable starts at the amplifier and goes to the first loudspeaker, from there to the second loudspeaker and from there to the third loudspeaker etc.
- Remember that the total wattage of all of your loudspeakers added together must NOT be higher than the rated wattage of your amplifier
- Prepare your loudspeakers for installation – each 100v line loudspeaker will have a number of wattage tappings or settings – it is best to start off by using the middle wattage (ie: if you have 1, 2, 4, & 8 watts you could use the 4w setting) – this allows you to increase or lower the volume of each loudspeaker later
- On some loudspeakers you connect your cable to ‘com’ (or ‘common’) and to the chosen wattage connection and on others you connect a tag to the chosen wattage connection or select via a switch and connect your cable to the short fly leads
- All loudspeakers must be connected in the same phase – it is likely that your cable and your loudspeakers do not have the same coloured wires – choose an obvious convention such as brown cable to red or + on loudspeaker and blue cable to black or – on the loudspeaker (for instance) and stick to it throughout your installation
- Once you have installed and connected all of your loudspeakers and you are happy that there are no short circuits or other problems with the installation you can connect the other end of your cable to your amplifier
- Your amplifier will probably have both low impedance (low Z or 8Ω) and 100v line connections – you must never use both at the same time or connect low impedance speakers to the 100v line terminals
- Connect your wires to the 100v and ‘com’ (or on some amplifiers to the pair of terminals marked 100v line)
- Your amplifier should ideally sit on top of your media player and other units so that there is adequate ventilation and airflow to keep the amplifier cool
- Turn all volume controls to minimum and set all bass and treble controls to midway
- Connect your microphone to the amplifier and switch your amplifier on
- Turn your master volume to around midway and gradually turn the microphone volume (or input volume) up while speaking into the microphone
- Adjust to the volume level that is required
Zoned PA sound systems
Wiring low impedance speakers
Reminders – PA sound systems – basic setup rules
- Always turn on the power last – after you have connected up the whole sound system
- Always turn the power off first – before you strip down the sound system
- When turning your system on connect mains power to switch on your amplifier last after powering all other devices
- When turning your system off disconnect mains power to switch off your amplifier first before disconnecting all other devices
- Microphones should always be connected to inputs marked ‘mic’ on amplifiers
- Wireless microphone, or radiomic, systems usually have two outputs – the XLR output should be connected to XLR inputs marked ‘mic’ on amplifiers and the jack output should usually be connected to inputs marked ‘aux’ or ‘line’ on amplifiers
- Media players should always be connected to inputs marked ‘aux’, ‘CD’ or ‘line’ on amplifiers
- Remember – you must still project your voice when using any sort of microphone amplification system

and ALWAYS use the microphone from a position behind the loudspeakers - Commercial and industrial 100v line cabinet, projection, horn, ceiling & column type loudspeakers should always be connected to the 100v line terminals on amplifiers
- Hifi, disco and similar 8Ω – low impedance cabinet type loudspeakers should always be connected to the 8-16Ω terminals or connectors on amplifiers – never connect these speakers to the 100v terminals on amplifiers
- Never use 100v line & 8Ω speakers on the same sound system

Inputs
- Microphones should only be connected to inputs marked ‘mic’ or ‘microphone’ while line sources such as media players should always be connected to inputs marked ‘aux’, ‘CD’ or ‘line’ on amplifiers
- As a rule of thumb a jack output on a wireless microphone receiver is line level and an XLR output is mic level
- When needed to can usually feed two or more amplifier inputs with the same signal from an MP3 player, internet radio or other device

Speaker Leads
- Internal fuses will blow, amplifiers will shutdown and damage will occur if you use faulty speaker leads or damaged speakers. Always look after your interconnect cables – they are easily damaged – especially in a portable or mobile sound system. The leads and any damage directly caused by using faulty leads is not covered by the Sound Services or manufacturers warranty unless the leads exhibit a manufacturing fault. Immediately stop using the sound system if you suspect that you have damaged the speaker leads or speakers in any way
- Maximum volume that a PA sound system is capable of producing before incurring equipment damage will be apparent by noticeable audio distortion – this may well occur when the volume control(s) are set well down from their maximum position! If you can hear distortion the sound system is being damaged! Turn the volume and the bass down!
- Most portable sound systems can only be used with a maximum of two 8 ohm speakers
Acoustic Feedback (Howl)
Acoustic feedback and howl is caused by a number of factors such as microphones being too close to loudspeakers, too much volume or bass, unmatched equipment or equipment not suited to the use or venue
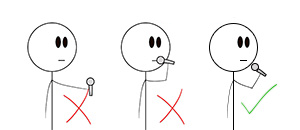
- To avoid acoustic feedback howl in PA sound systems microphones should not be used in front of or otherwise near to any loudspeakers. For live sound it is important to hold your mic correctly
- Always ensure that the person wearing/using the microphone or wireless mic does not go within 3m to 4m of the loudspeaker(s)
- Body worn clothing clip and lapel microphones should be central on the body and around 20cm below the mouth. Feedback is much more likely with this sort of microphone – it can only be used to reinforce the voice
- Headworn microphones should always be protected by a foam windshield and be worn as near to the mouth as possible
- Hand held microphones sound ‘warmer’ and exhibit less feedback if they are used closer to the mouth
- Remember – you must still project your voice when using any sort of microphone system
- Feedback is primarily caused by proximity of microphone(s) to loudspeaker(s), incorrect placement of loudspeakers, too much volume and/or incorrect tonal settings on the amplifier – turn the bass and volume down and use the low cut filter!
- The microphone(s) must always be behind the loudspeakers
- If necessary use a specialist feedback controller with your sound system
Watts
Unlike many we state wattage as RMS ratings (true wattage) – if we mean PPMO music power, US watts or peak watts we say so. Remember American peak PPMO music power watts can be stated as up to 4 times higher than RMS – often causing confusion
UK Licenses for Music, Wireless Microphones / Radiomics and In Ear Monitoring (IEM)
Wireless Microphones
- Wireless microphone systems should preferably be connected to inputs marked ‘mic’ on amplifiers
- Remember – you must still project your voice when using any sort of microphone amplification system
- To avoid acoustic feedback (howl) microphones must never be used in front of or otherwise near to any loudspeakers. Always ensure that the person wearing/using the microphone / wireless mic does not go within 3m to 4m of the loudspeaker(s)
- Body worn and clothing clip mics should be central on the body and around 20cm below the mouth. Feedback is very likely with this sort of microphone – it can only be used to reinforce the voice
- Headworn microphones should always be protected by a foam windshield and be worn as near to the mouth as possible
- Hand held microphones sound ‘warmer’ and exhibit less feedback if they are close to the mouth
- Feedback is primarily caused by proximity of microphone(s) to loudspeaker(s), incorrect placement of loudspeakers, too much volume and/or incorrect tonal settings on the amplifier
- The microphone(s) must always be behind the loudspeakers
- VHF wireless microphones will normally transmit up to 33m (100ft) from the receiver in the poorest conditions – in optimum conditions this distance can, at times be doubled. UHF wireless microphones will not normally extend beyond this 33m maximum
- Always remember to keep wireless microphone transmitters at least 2 to 3m from their receivers and use each transmitter at least a 1m or away from other transmitters
- Remember that the wireless microphone transmitter and receiver should have ‘line of sight’ between each other
- Please note that wireless microphone receivers can be affected by CD players and other equipment which may produce RF (radio waves)
- Please read all manufacturers instructions prior to using any equipment
- For sports, aerobics, dance and other exercise based activities it is preferable to wear you wireless microphone transmitter belt pack in a custom pouch and belt such as the IMG Stageline belts
Batteries
- Please ensure that the manufacturers instructions including the initial charge and use of rechargeable batteries and their recommended care of rechargeable batteries is noted and passed on to all users of battery operated equipment
- Never attempt to recharge any style or make of dry cell battery
- Always fully charge NiMh rechargeable batteries prior to use
Other Considerations
- Please read all manufacturers instructions prior to using any equipment
- Induction loops must reach EN60118-4 (formally BS6083 Part 4 1981), BS7594 and the requirements of the RNID.
Construction Industry Tax Deduction Scheme
- Please note: “that the installation of security systems including burglar alarms, closed circuit television and public address sound systems are specifically excluded from the Construction Industry Tax Deduction Scheme”. Should you require further information please obtain a copy of booklet IR14/15 in the Construction Industry Series, September 1992 from your local Inland Revenue Office. This exclusion requires that no financial deductions be made to any payments for tax purposes
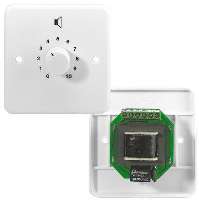
100v Line Attenuators
- 100v line volume attenuators on PA sound systems must be wired correctly – the ‘in’ terminal is the ‘hot’ from the amplifier (usually the brown cable) with the terminal adjacent often marked with an arrow the return to the amplifier (usually the blue cable). The ‘out’ terminal is the ‘hot’ to the 100v line loudspeaker (usually the brown cable) with the terminal adjacent usually marked with an arrow the return to the loudspeaker (usually the blue cable)
- For most purposes you should ignore the + & – 24v relay connections (if fitted)
- Do not exceed the rated power of the attenuator – the total wattage of speakers attached to the attenuator must not exceed the wattage rating of the attenuator
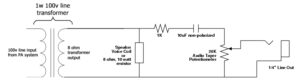
100v Line Transformers
- It is important that 100v line transformers are correctly connected to your PA sound system
- The transformer should be close to the loudspeaker and not to the amplifier
- Connect the low impedance side of the transformer (usually marked ‘C’, ‘8’ & ‘16’ to the loudspeaker) by wiring the loudspeaker to the common ‘C’ and 8 ohm ‘8’ terminals of the transformer
- Do not connect more than one loudspeaker to each transformer
- The transformer and loudspeaker pair can then be sited up to 100m from the 100v line amplifier
- Choose the required wattage on the 100v line side of the transformer (marked ‘C’, ‘10w’, ‘5w’ & ‘3w’ etc) and connect to the amplifier’s 100v line output terminals using two core twin sheathed 6a flex
- Usually use the half wattage setting to start with – so if you have a transformer with a 20w terminal use the ‘C’ and ‘10w’ terminals to connect to your 100v line amplifier
- Remember these connections are at 100v AC and can be dangerous
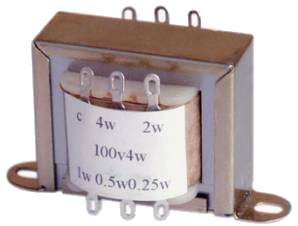
The total load wattage of transformers and loudspeakers that can be connected to your 100v line amplifier must not exceed the output of the amplifier – so you can connect two 10w transformers and a 5w transformer to a 25w amplifier or, say, 5 x 10w transformers to a 50w amplifier
Connecting 100v Line to Aux or Line input on another amplifier